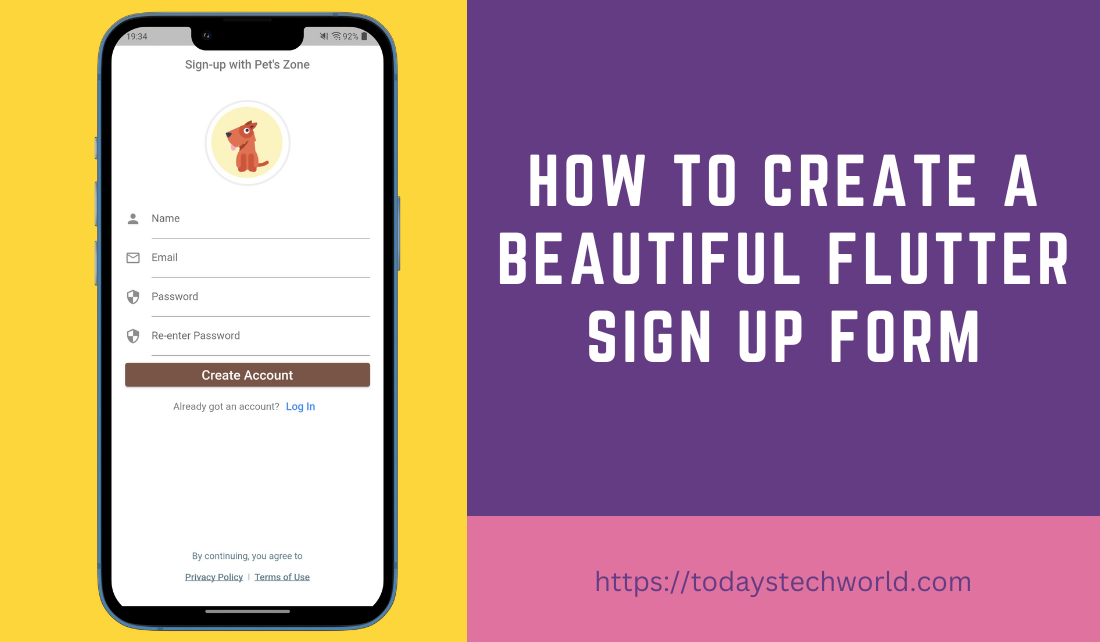
Here we will discuss how to create a beautiful flutter sign up form page for the Android and iOS app with basic attributes like name, email, and password. Usually designing a sign up page is straightforward as we need to just arrange attributes in order and call it a flutter sign up form page. However, making it catchy and simple together is challenging.
We will be discussing creating a beautiful flutter sign up form page using basic widgets like TextFields, material icons, and a couple of other button widgets.
In continuation of the previous article, “How to create a beautiful flutter login page” for a pet store, we will be moving one step ahead and creating a flutter sign up form page example for the same pet store.
Steps to design a beautiful Flutter sign up form page
In order to explain the whole flutter sign up form page creation I am going to divide the content into bullet points which will be explained in subsequent order.
- Install the material package in your project (required to use material icons)
- Create a dart page with the name myPetStoreSignUpPage
- Create AppBar and Logo Container
- Create four Text Fields (to act as flutter sign up form fields)
- Create a Sign Up button named “Create Account” and an optional Sign In button (So that the user can go back and sign in if already registered)
- Create Terms of Use and Privacy Policy links
Here is how the page design will be done subsequently-
Important Read: 20 Best App Review Sites to Submit Your App
1. Install the material package in your project
Run the below command to add the package to your project-
Package Directory> flutter pub add material
Or you can simply add this line in pubsec.yaml file under dependencies-
material: ^1.0.0+2Also Read: 5 Best Material Design Icons Alternatives
2. Create a dart page with the name myPetStoreSignUpPage.dart
As we have already described in a previous blog post we create a separate dart page. We usually create different classes (different .dart files) in order to keep the code complexity minimum and easy to manage a complex project.
Here is the backbone of our flutter sign up form page which is governed by a Scaffold with a Column widget body and an AppBar-
import 'package:flutter/material.dart';

class SignUpPage extends StatefulWidget {
  @override
  _SignUpPageState createState() => _SignUpPageState();
}

class _SignUpPageState extends State<SignUpPage> {


  @override
  Widget build(BuildContext context) {
    return Scaffold(
      appBar: returnAppBar(),//This mothod will return our AppBar Design (top bar)
      body: Column(
          crossAxisAlignment: CrossAxisAlignment.center,//to keep widgets in center
          children: [
            returnLogo(), //return Widget that contains pet store logo
            returnNameTextField(), //will return Name Text Field
            returnEmailTextField(),//will return email Text Field
            returnPasseordTextField(), //will return password Text Field
            returnReEnterPasseordTextField(),
            returnSignUpButton(), //Create Account Button on Sign Up Page
            returnLoginButton(), //Redirect button for login page
            Spacer(), //This will keep the privacy policy at the bottom
            returnPrivacyPolicyOptions(), //Privacy Policy and Terms of Use Button
          ],
        ),
    );
  }
}
Also Read: Top 5 Dart/Flutter Packages for beautiful UI design
3. Create AppBar and logo container
Here we will be creating the returnAppBar and returnLogo methods. Here is the straightforward code with comments to help you understand each line and syntax-
returnAppBar() {
return AppBar(
title: Text(
"Sign-up with Pet's Zone",
style: TextStyle(fontSize: 18, color: Colors.black54),
),
centerTitle: true,
backgroundColor: Colors.white,
);
}
returnLogo() {
return Padding(
//Padding to keep the logo look distinctive
padding: const EdgeInsets.only(top: 10.0, bottom: 20),
child: CircleAvatar(
radius: 65,
backgroundColor: Colors.grey[200],
child: CircleAvatar(
radius: 62,
backgroundColor: Colors.white,
backgroundImage: AssetImage("assets/logo.png"),
),
),
);
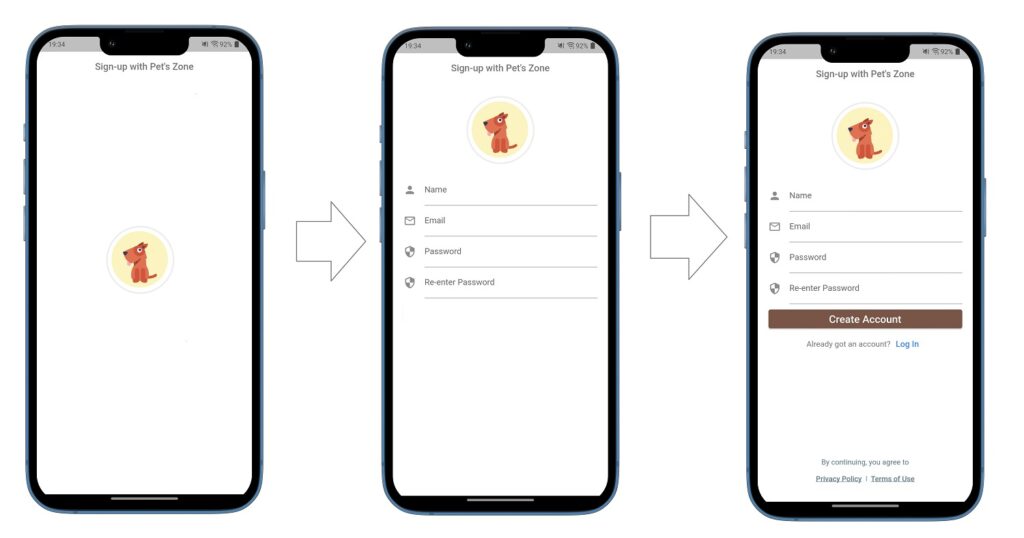
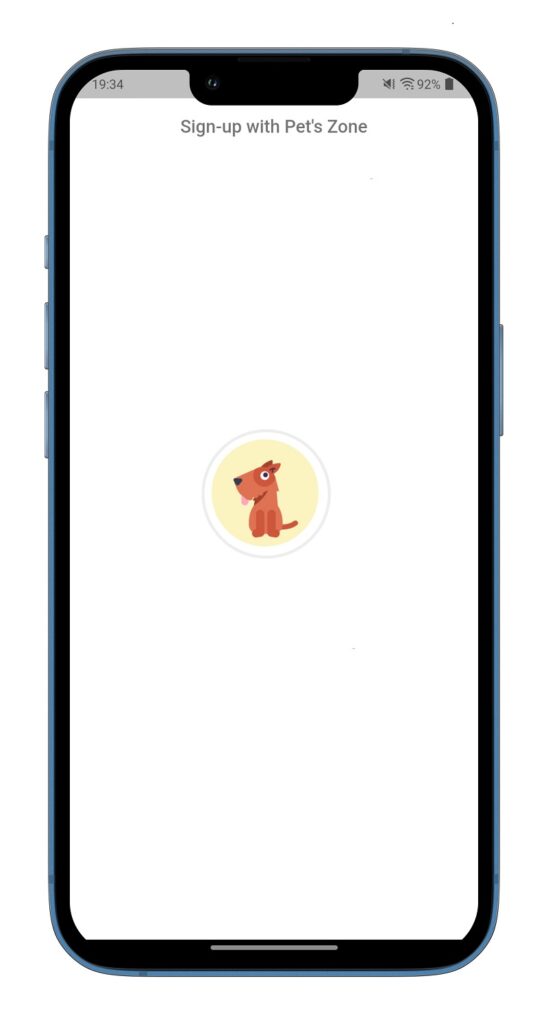
}Here is what it should look like –
4. Create Text Fields
Creating text fields in flutter is not straightforward. You need to associate it with a TextEditingController so that whenever a text field is changed with an associated TextEditingController, the text field updates its value and the controller notifies its listeners.
So, we need to create TextEditingControllers for each Text Field and associate it with respective methods. It may sound complicated but it is not. Here is the piece of code where we have created input controllers and initialized them (important for Text Fields to work). We have created them as late to keep our code null safe.
  late TextEditingController signUpNameController;
  late TextEditingController signUpEmailController;
  late TextEditingController signUpPasswordController;
  late TextEditingController signUpReEnterPasswordController;

  @override
  void initState() {
    signUpNameController = TextEditingController();
    signUpEmailController = TextEditingController();
    signUpPasswordController = TextEditingController();
    signUpReEnterPasswordController = TextEditingController();
    super.initState();
  }
In order to make Flutter sign up form look and feel more beautiful we will add an icon to add meaning to the Text Field. For example, we have added a person icon next to the Name Text Field, a Mail icon next to the Email text fields, and so on.
Here is the code for the Name Text Field-
returnNameTextField() {
return Container(
width: MediaQuery.of(context).size.width * 0.9,
child: TextField(
cursorColor: Colors.brown,
controller: signUpNameController,//to associate text field with controller
decoration: InputDecoration(
labelText: "Name",
icon: Icon(Icons.person),
hoverColor: Colors.brown),
),
);
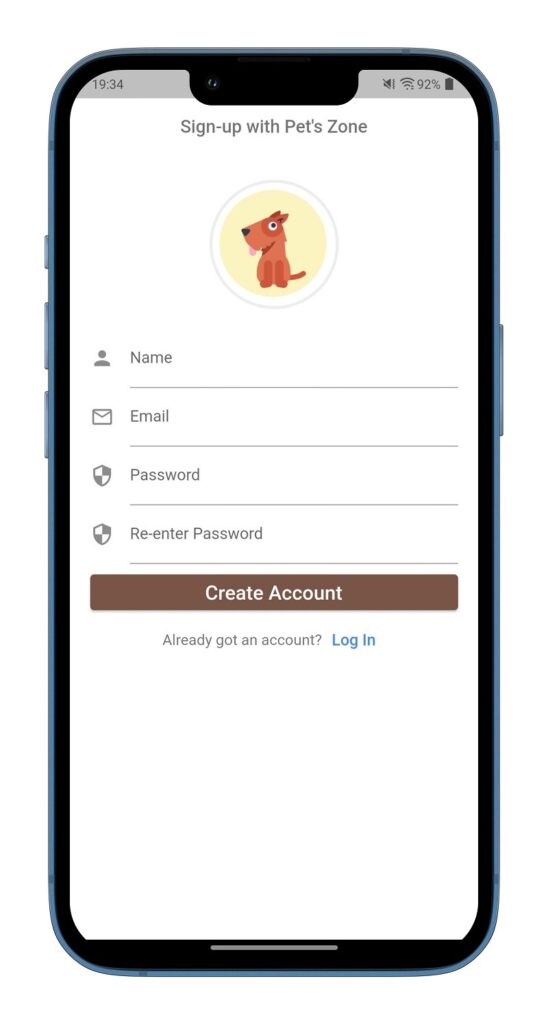
}Here is what our Flutter sign up form should look like-

In order to create the form sign up button we will use ElevatedButton which is a pretty basic and easy-to-use button. In order to keep the width dynamic we will use MediaQuery to fetch the device width and keep the button witch 90%.
Here is the code for Sign Up Button –
returnSignUpButton() {
    return Container(
      width: MediaQuery.of(context).size.width * 0.9,//90% of device width
      padding: EdgeInsets.only(top: 5),
      child: ElevatedButton(
        style: ButtonStyle(
          backgroundColor: MaterialStateProperty.all(Colors.brown),
          foregroundColor: MaterialStateProperty.all(Colors.white),
        ),
        onPressed: () {},
        child: Padding(
          padding: const EdgeInsets.all(4.0),
          child: Text(
            "Create Account",
            style: TextStyle(fontSize: 20, fontWeight: FontWeight.w500),
          ),
        ),
      ),
    );
  }
Here is the code for the next login button which is very useful for user navigation (in case the user is already registered then he/she should be able to return to the actual login page).
returnLoginButton() {
    return Container(
      width: MediaQuery.of(context).size.width * 0.9,//90% of actual device width
      child: Row(
        mainAxisAlignment: MainAxisAlignment.center,
        crossAxisAlignment: CrossAxisAlignment.center,
        children: [
          Text(
            "Already got an account?",
            style: TextStyle(
                fontSize: 15,
                color: Colors.black54,
                fontWeight: FontWeight.w400),
          ),
          TextButton(
              onPressed: () {},
              child: Text(
                "Log In",
                style: TextStyle(
                    fontWeight: FontWeight.w500,
                    color: Colors.blueAccent,
                    fontSize: 16),
              ))
        ],
      ),
    );
  }
We are not focusing on onPressed functions as we are only developing sign-up forms and not implementing the actual sign up functionality. Here is what it should look like –
6. Create Terms of Use and Privacy Policy links
Now the last option is adding privacy policy and terms of use buttons which is very important to avoid any legal complications and tell users your policies related to data privacy and terms with which users can use your app.
We have added a Spacer widget in between the SignUp buttons and Privacy Policy buttons so that this button can be pushed to the bottom. Here is the code-
returnTermsOfUseAndPrivacyPolicyButton() {
return Column(
children: [
Text(
"By continuing, you agree to",
style: TextStyle(color: Colors.blueGrey, fontSize: 13),
),
Row(
mainAxisAlignment: MainAxisAlignment.center,
children: [
Container(
alignment: Alignment.center,
child: TextButton(
child: Text(
"Privacy Policy",
style: TextStyle(
color: Colors.blueGrey,
decoration: TextDecoration.underline,
fontSize: 12),
),
onPressed: () {},
),
),
Container(
color: Colors.blueGrey,
width: 1,
height: 10,
),//Works as a vertical divider bwtween two buttons
Container(
alignment: Alignment.center,
child: TextButton(
child: Text(
"Terms of Use",
style: TextStyle(
color: Colors.blueGrey,
decoration: TextDecoration.underline,
fontSize: 12),
),
onPressed: () async {},
),
),
],
),
],
);
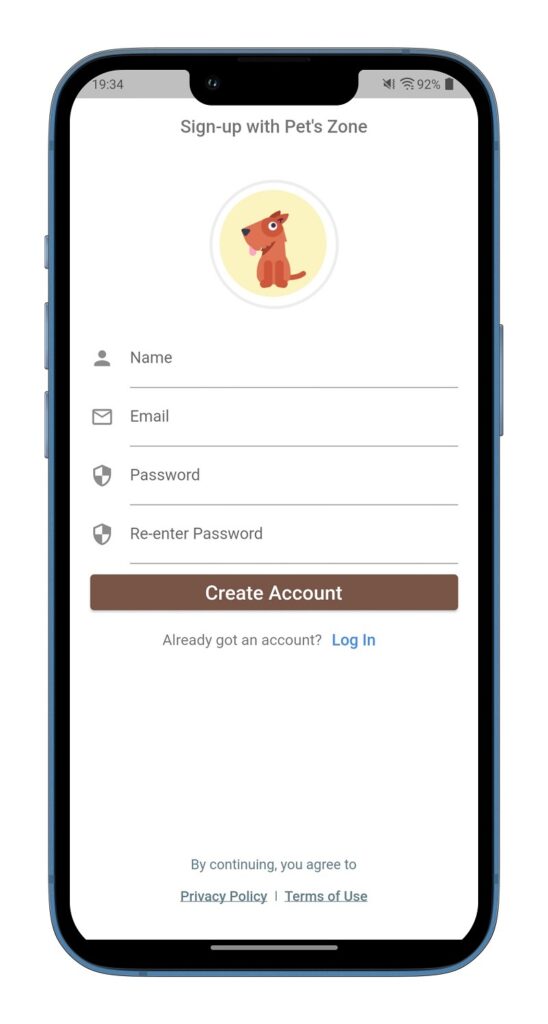
}Here is the final Flutter Sign Up Form page with all the essential fields and buttons.
Closing thought
Creating a Flutter sign up form page is really interesting and creative work. I hope you loved our sample flutter sign up form page design. Sign up page require very specific details from the customer so you should never over-exaggerate the design and keep it as simple as possible. Let us know if you liked it and share your thoughts.