What are hidden Android 11 features? What are Android secret features in 2021 updates? What are the Android best features, tips, and tricks? We will answer all these questions going forward in this article. Let’s start with a brief introduction to Android.
Android is the most popular mobile operating system across the globe. Packed with a rich set of useful features, Hacks, Easter eggs, and a much better look and feel experience, Android has been with us since 2008 and getting better and better with every release.
Prior to the Android era, Mobile Technology was not much fun. Mobile Operating systems were limited to performing functions like calculators, web browsing, mini-games, etc.
Initially, Google developed android as Operating System for digital Cameras. Observing its extensibility, Google started enhancing it which Later came out as Android, much better than other mobile OS in terms of features, usefulness, extensibility and became popular very soon.
In this article, you will learn about the 18 best Android secret features and hacks and Android Update features from the latest version, that will make your day-to-day mobile usage easy and fun. Let’s learn about each of them in detail.
Here we go with the Android features list-
Contents
- 1 1- Enable Android 11 Bedtime Mode:
- 2 2- Focus Mode Android:
- 3 3- “Force GPU Rendering” -Enable Enhanced Gaming Performance –
- 4 4- Smart Lock Android Feature:
- 5 5- Find my device Android (Find my phone feature):
- 6 6- Using Guest Mode on Android for better privacy:
- 7 7- Android App Permission Manager:
- 8 8- Google Lens:
- 9 9- Nearby Share in Android:
- 10 10- Run Android Apps on Windows 11:
- 11 11- Enable Android Live Caption:
- 12 12- Enable and Schedule Comfort view on Android:
- 13 13- Enable Gesture Navigation/ Control in Android:
- 14 14- Using Split Screen for Multi-tasking in Android:
- 15 15- Turn Off All Sensors at once in Android:
- 16 16- Change App Icons on Your Android Smartphone:
- 17 17- Android Generic Codes or Secret Codes for android:
- 18 18- Disable Activity Transition Animations on Android to Improve Performance:
- 19 Few words of caution while working with Developer Option and USSD-
- 20 Final Thoughts
1- Enable Android 11 Bedtime Mode:
In the era of rush, good sleep has been an essential recommendation by health experts. Unnecessary notifications and calls can spoil a good night’s sleep easily. Bedtime mode is one of the android secret features that can be handy in such cases. You can simply enable google bedtime mode and leverage bedtime mode benefits.
How to enable Android Bedtime Mode?
- Open Settings from the app drawer or home screen.
- Scroll down to the Digital Wellbeing section.
- Tap Digital Wellbeing & parental controls.
- Select Bedtime mode.
Select the options like DnD, Grayscale etc. - Schedule the Bedtime and hit turn on now to enable Bedtime mode.

2- Focus Mode Android:
What is focus mode? Focus Mode, an initiative from digital wellbeing, is a more clarified version of the Do Not Disturb mode in Android. Why do we need Focus Mode in Android phones?
Sometimes mobile phones can be distracting. Especially, when we want to work on something that needs our sheer attention and focus.
Focus Mode is one of the best Android secret features that are helpful in avoiding phone distractions. When you need time to focus you can enable focus mode and select all the distracting apps to disable their notifications.
How to activate Focus Mode in Android?
- Open Settings from the app drawer or home screen.
- Scroll down to the Digital Wellbeing section.
- Tap Digital Wellbeing & parental controls.
- Select the Focus mode.
Choose the apps that you want to pause. - Hit Turn on now to enable Focus mode.

3- “Force GPU Rendering” -Enable Enhanced Gaming Performance –
One of the lesser-used Android secret features, Force GPU rendering is basically allowing Android’s dedicated GPU to work for graphics calculations, processing, and rendering.
Force GPU rendering option was mainly introduced to make it easier for developers to test the effect of GPU rendering on their app. Let’s understand in more detail.
GPU is Graphics Processing Unit. Although CPU works for all the processing along with few graphics processing as well. But in the case of Forced GPU rendering, GPU takes the graphical processing part away from the CPU and dedicates itself to all graphics works.
Since the GPU is much better with graphical data, the end result is better performance for both the CPU and the GPU.
How to enable “Force GPU Rendering” in Android?
- Open Settings from the app drawer or home screen.
- Scroll down to the Developer Options.
- If you don’t see the option, tap on About phone (About device) and look for an entry called Build Number. If you don’t see the option, tap on About phone (About device) and look for an entry called Build Number.
- Scroll down to the Hardware accelerated rendering and enable the toggle next to Force GPU rendering.

Drawbacks of Force GPU Rendering in Android?
Although Force GPU Rendering helps in enhanced Graphics experience, especially while gaming but this makes processor do more work than usual. More engaged processor requires more power which eventually drains battery faster. If that is not an issue then you can enable it to have an awesome gaming experience in your Android device.
Also Read: What is Internet of Thing (IoT). How does it work?
4- Smart Lock Android Feature:
Due to Privacy and Security, locking your device is essential but sometimes it can be hectic and irritating to do all authentication steps again and again.
Google is smart and understands this burden that is why they have equipped Android with the next Android secret feature called Smart Lock feature which locks your Android device in a smart way.
With Smart Lock enabled and switched on, Android device stays unlocked when it’s connected to a trusted device, like a smartwatch, Car, etc. or when it’s in a familiar spot, like your pocket or near your trusted voice, trusted face, etc.
How to turn on Smart Lock Android?
- Open Settings from the app drawer or home screen.
- Scroll down to Security Options and tap on Advanced.
- Tap Trust Agents and make sure the Smart Lock feature is on.
- Select appropriate ones from available options.
- On-Body Detection
- Trusted Places
- Trusted Devices

5- Find my device Android (Find my phone feature):
Very few people are aware of Android’s “Find My Device” or “Find My Phone” feature. One of the best Android secret features, the FMD feature is handy in situations like finding a phone in your messy room or finding your phone when it is lost or stolen.
To track your phone via this feature, two things have to be enabled — the feature itself and Google’s Location Services. Along with this, the phone needs to remain turned on. Here is what needs to be done next.
Visit android.com/find from your laptop or any other phone. Make sure you are logged in with the same Google account which you want to track.
Use the Play Sound option to ring the device. It works even if the phone is silent and helps in finding the device if it is lying under the table or in a pile of mess. In case you want to locate your device, check the map and it will show the latest location of the phone.
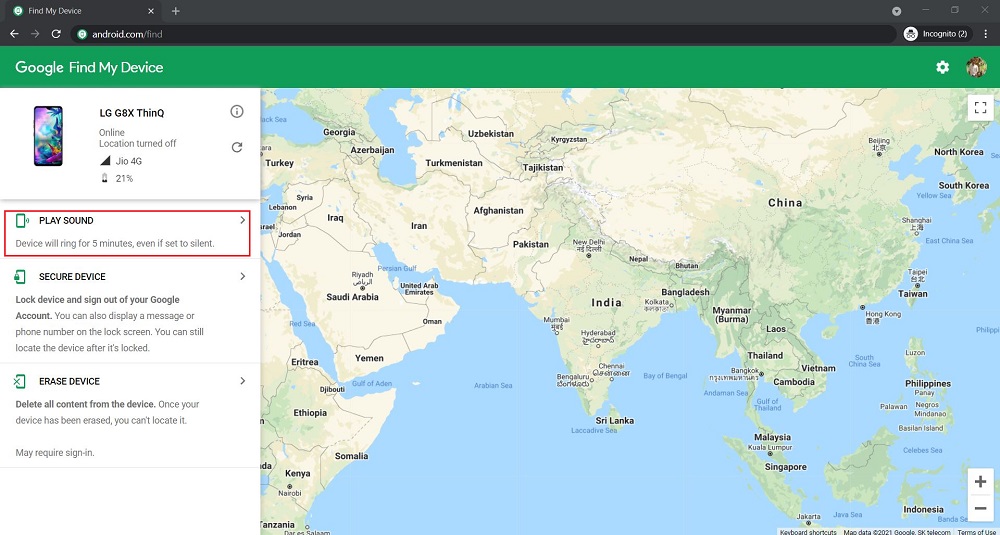
How to enable Find My Device Android?
Step 1: Open Settings and tap on Security
Step 2: Look for Find My Device. If the app is listed but is turned off, use the toggle to turn it on. Alternatively, few mobile manufacturer also provide built it device locator services like Samsung’s Find my Mobile App. You can try that too.
Also Read: 12 Best Google Search Tips and Tricks
6- Using Guest Mode on Android for better privacy:
Why do we need Guest Mode on Android? Let’s find out more on this. Time to time everyone has to share their phones to others. And it is anxious moment until cellphone is returned to its original owner.
Not only for privacy reasons but also sometime people avoid handing over their phones to others like kids because they might spam their contact or delete some important file or document.
Android’s Guest Mode is very useful feature to tackle these problems. You can simply enable it and handover your phone to other without much worrying about it. Other user will be able to use some default apps but they can’t see any of your data because your Google account won’t be logged in.

How to turn on Guest Mode in Android?
- Swipe down from the top of the screen to pull down the notifications bar.
- Tap your avatar on the top right twice.
- Now you’ll see three icons – your Google account, Add guest and Add user.
- Tap Add guest.
- Now your smartphone will switch to guest mode.
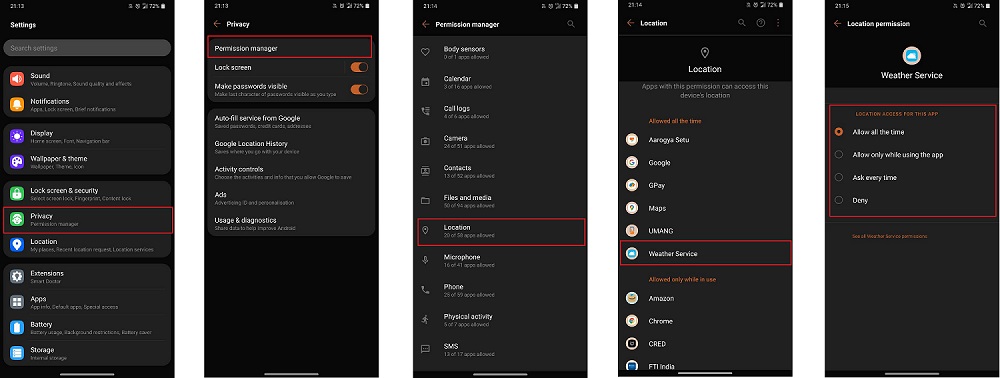
7- Android App Permission Manager:
Android understands the need of privacy and since last few updates it provides flexibility to Manage and control permissions for each apps and grant or revoke as per need.
You can browse through all the permissions (like Contacts, Locations, Camera etc.) and find out which app has access to these permissions.
How to check and Manage/control App Permissions in Android?
- Open Settings from the app drawer or home screen.
- Scroll down to the Privacy Options and tap on it.
- Next tap on Permission Manager.
- Scroll though all the Permissions and check which App has access to particular permission.
- Permit or Deny based on your privacy preferences.
8- Google Lens:
Android comes with built in Google Lens, which enables you to point your phone at something, such as a specific plant, product to be bought, etc. and provide the details about the object.
What is Google Lens? Google Lens is an image recognition technology developed by Google, designed to bring up relevant information related to objects it identifies using camera interface.
Google Lens is handy in many scenarios including but not limited to-
- Easily Image to text conversion using Google Lens- Just turn the lens on and put your camera in front of any image with texts. Google lens will read it and provide option to copy the text.
- Barcode and QR Code Reading using Google Lens Scan- You can use Google Lens to read QR code too.
- Identify Objects using Google Lens- You can use Google Lens to identify stuff like plant, animals, machine parts etc. No need to ask fellow companion about it. Just put Google Lens and it will provide details about identified object.
- Discover Product online using Google Lens- Yes, you can scan the product and Google Lens will suggest the possible websites where you can order the same product.
How to activate Google Lens?
Google Lens app is now in built inside android. You need to just open it and start using it as camera to detect object.
If you want to scan some existing photograph for details about it, please follow below steps-
- On your Android phone or tablet, open the Google Photos app .
- Select a photo.
- Tap Lens .
- Depending on your photo, check the details, take an action, or find similar products.
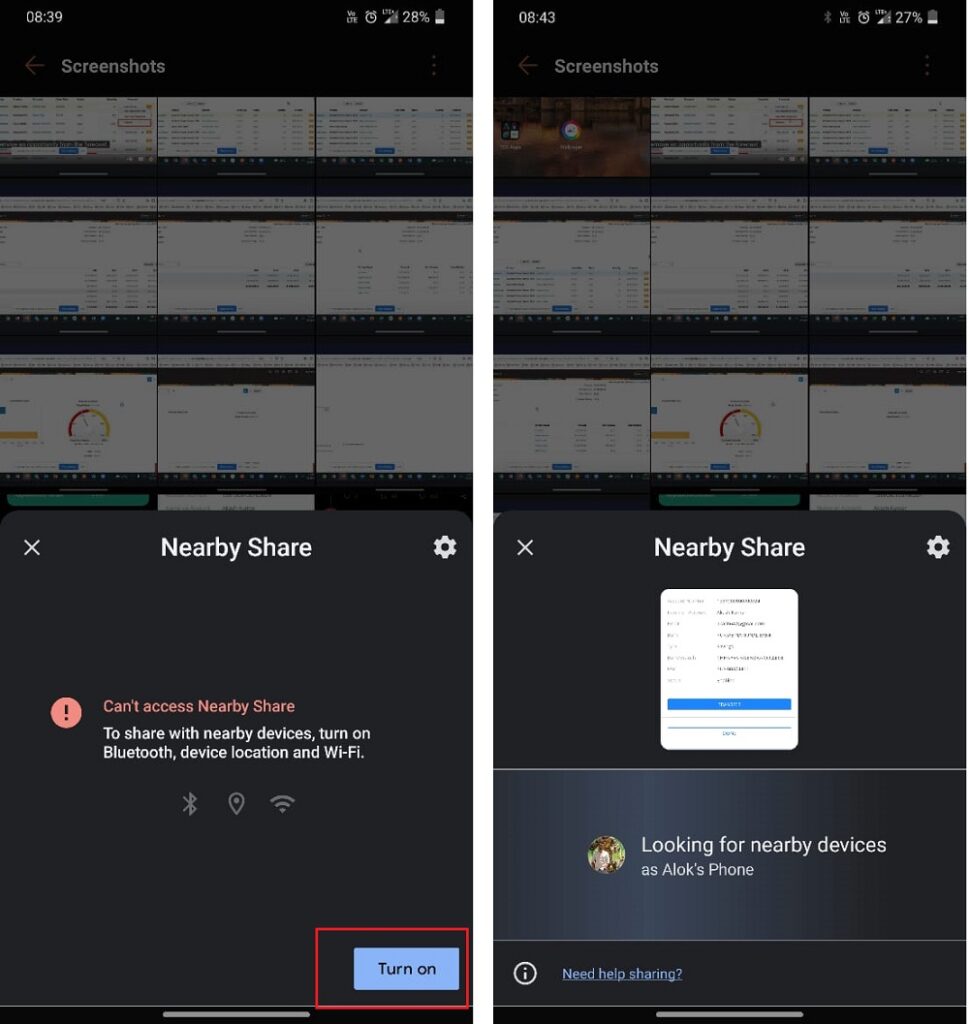
Now a days there are tons of file sharing apps like Shareit, Superbeam, etc. on Android play store which asks for huge number of unnecessary permissions and collects users personal data. Surprisingly a lot of people still use it while we have some easy out of the box solution called Nearby Share.
Nearby Share is a feature of Google’s mobile and desktop operating systems Android and Chrome OS that allows data to be transferred via Bluetooth and Wi-Fi. Since it is native feature, it is way faster than third party apps.
- Open the media file or document you want to share and tap the three dot option at bottom.
- Tap Share option and later tap Nearby Share.
- It will require Bluetooth, WiFi and Location to be switched on to Communicate with Nearby Share.
- Tap on the nearby device and share the file.
10- Run Android Apps on Windows 11:
Answer to your curiosity is Yes it is possible now to run Android Apps and games in Windows11. But, before going forward on this discussion I want to let you know that this is still a beta feature. Microsoft is still working to bring full support of Android Play Store in Windows 11.
This all started with initial work of few Italian UI/UX designers who bring Android Play Store in windows 11 using detailed steps. Which is available on GitHub. Google’s Android app store is fully functional within Windows 11 using this method, allowing you to install a game or app and run it alongside traditional Windows apps along with few lags still there.
Microsoft have started testing Windows 11 Android app support, but the official implementation is limited to the Amazon Appstore and less than 50 apps during the preview phase. Getting the Google Play Store installed opens Windows 11 up to every Android app or game you’d want to use.
If you are interested you can follow instructions given in this link to try Android in Windows 11.
Also Read: 18 Best Google Chrome Features and Hacks
11- Enable Android Live Caption:
This feature is useful for Differently Abled people who have hearing problems. This feature is also handy for situations when you want to just read the caption instead of listening to a video or audio podcasts.
Android Live Caption automatically adds a captions to any audo podcast, video, or audio message on your phone. It even works with videos or audio files you’ve recorded yourself. You don’t need to have an internet connection for this to work, and it doesn’t send any data to Google as everything is handled locally on the phone.
How to enable Android Live Caption?
Starting Live caption is very simple. In some cases you might need to start developer option but usually it is available out of the box.
Try below steps to easily start Android Live Caption.
- Open Settings from the app drawer or home screen.
- Go to Accessibility > Live Caption.
- Select the Live Caption to turn it on.
Also Read: Explained in Short- How does Internet works?

12- Enable and Schedule Comfort view on Android:
Android provide Comfort view which eliminates the blue light component for a comforting experience while using phone. This feature is handy while reading article in night or in the dark in your phone. Let’s understand more on Comfort view on Android and why we need comfort view feature on Android?
Using cell phone for a long period of time can cause eye strain and pain. Blue light is the main component which cause such problems. Continued exposure to blue light over time could lead to damaged retinal cells.
How to enable Comfort View in Android?
Android provides easy navigation to enable or schedule Comfort view. Below are the easy steps to enable it-
- Open Settings from the app drawer or home screen.
- Scroll down to the Display section.
- Tap Comfort View.
- Enable Comfort View. Select the blue light filter and do the scheduling if needed.

What is Android “Gesture Navigation“? How to turn on Android 10 gesture navigation or swipe navigation? Let’s find out in detail.
Google know that using Buttons on UI & UX is old fashioned and Gesture control is the new norm. That is why they have enabled Android with Gesture Control feature since Android 10 version. You can continue to use old 3 soft key navigation but if you like to try something new you can opt for Gesture Control navigation capability.

- Open Settings from the app drawer or home screen.
- Scroll down System Options.
- Tap System Navigation.
- Select Gesture Navigation and toggle it on or off.
14- Using Split Screen for Multi-tasking in Android:
Mobile phones are not limited to just make a call or watch a video. It is also being used by professionals in their day to day life and sometime it requires multi-tasking too.
Latest Android devices are equipped with Android update features called split-screen feature to support multi tasking like watching a video and making notes or texting in the same screen.

How to enable Multitasking Split-Screen in Android?
- On the home screen, tap the app-switcher icon, this launches the familiar card-based multitasking window.
- Tap and hold one of the apps that you’d like to have onscreen, then drag it up to the top of the screen (don’s swipe up. It will close the app).
- The app will take up the top half of your display. The bottom half will show the app-switching screen.
- Select the other app that you wish to show in other half on the screen.
If a device runs Android 7.0 or higher, it automatically supports split-screen mode. No other settings are required to enable it.
15- Turn Off All Sensors at once in Android:
How to turn off proximity sensor on Android? How to turn on and off all sensors on Android? If you are tech savvy then quite often you must be coming up with these questions. Because you are aware of how much privacy prone mobile technology can be. So it is very much needed to have flexibility to turn on and off the sensors like locations sensor, camera sensor if it is not in use.
Android provide feature to turn of all the sensors at once. This will disable sensors like Camera, Mike, Speaker, Location, etc. Pease note that this is Developer mode feature and should be used only if you know it well. After you disable it your apps won’t be able to use any of these sensor hardwires. Don’t forget to enable it back.
How to disable All Sensors in Android?
- Open Settings from the app drawer or home screen.
- Scroll down to the Developer Options.
- If you don’t see the option, tap on About phone (About device) and look for an entry called Build Number. If you don’t see the option, tap on About phone (About device) and look for an entry called Build Number.
- Scroll down to the Quick Settings and tap on Developer Tiles-Sensors Off.
16- Change App Icons on Your Android Smartphone:
Sometimes out of the box provided icon can be boring. Even custom launchers also provide dull app icons sometime. Android provide flexibility to use custom icons for its Apps.
All you have to do is-
- Search the app you want to change.
- Press and hold the app icon until a popup appears.
- Select “Edit”. The following popup window shows you the app icon as well as the application’s name.
- To choose a different icon, tap on the app icon. Now you can choose a different one from the available selection.
- Android provide flexibility to download an icon pack from the play store.
In below screenshot I have downloaded and used Splendid icon pack from play store to change icon of any apps.
![]()
17- Android Generic Codes or Secret Codes for android:
Unstructured Supplementary Service Data (USSD), also known as “quick codes” or “feature codes” or “custom dialer codes”, is an extra-UI protocol, which allows people to access hidden features from their Smartphones.
The USSD protocol allows you to access hidden features you didn’t know about right from your smartphone’s dialer. And easiest part is you can access all from your phone’s dial keypad.
Here are list of codes that you can dial and check information or enable/disable features with just a tap-
- Activate Call Waiting: *43# This code will activate call waiting;
- Deactivate Call Waiting by entering #43#.
- Check Your Call Forwarding: *#67#
- Display your IMEI: *#06#
- Hide Your Phone From Caller ID: #31# Entering this code will prompt a pop-up stating that your Caller ID had been disabled.
- Unhide Your Phone From Caller ID: *31#
- PDA and Phone firmware info- *#*#1234#*#*
- FTA Software version – *#*#1111#*#*. Dial *#*#2222#*#* for FTA Hardware version information.
- Displays Build time and change list number- *#*#44336#*#*
- Android Hack code for Google Talk Service Monitoring- *#*#8255#*#*
Note to readers- Please dial these codes with caution. If you are new to smartphones please avoid using these codes.

18- Disable Activity Transition Animations on Android to Improve Performance:
Turn off animation on Android can be very useful in saving resources. Android apps these days are focusing more on look and feel due to which they introduce a lot of animations while transiting one page to other. Although this provides better look and feel but it cause CPU to perform more work. If your phone is operating heavy apps or have lesser memory resources this will cause performance impact and your phone might lag.
Android provide out of the box feature to disable transition animation, or at least reduce the animation transition. This will make you feel abrupt transition inside app or while transiting between apps. Since CPU has one lesser task to perform it can allocate itself to so some other works. This will improve the performance of your device.
How to disable transition animation in Android?
- Open Settings from the app drawer or home screen.
- Scroll down to the Developer Options.
- If you don’t see the option, tap on About phone (About device) and look for an entry called Build Number. If you don’t see the option, tap on About phone (About device) and look for an entry called Build Number.
- Scroll down to the Window Animation Scale, Transition animation scale, and Animator duration scale.
- Tap on any of these options to disable it as per your convenience.
Few words of caution while working with Developer Option and USSD-
Android’s Developer Options are experimental features and you should be using it with caution. Since these features are either experimental or slightly complicated hence you should always use the features in Developer Options with cautions because it may break your settings or even enable some undesired option which is tricky to disable.
Final Thoughts
I hope you enjoyed learning about best Android features and hacks of 2021. In case you have any cool feature that is not mentioned in the list you can share it with us in the comments or email us. We will include it in the list and you will earn the credit.
Keywords: how-to-clear-app-data-and-cache-on-android, clear cache on android, Hidden features of Android, top 10 android tips and tricks, hidden features of android 10,


Can you please write about Android OS change and tweaks?